Installing Oracle Java 8 in Ubuntu

java-oracle

In an earlier post I talked about installing java in fedora 20. In this post I am going to do the same with Ubuntu. As you know Ubuntu is an Apt based repositories to install softwares. so its farely easy if you have the software in one of the Ubuntu pre-configured repository. But unfortunately Oracle java 8 is not included in one of those, Hence we will have to either download the same from java website and configure all by ourselves or use a third party repository for the same. Here i will talk about the easiest way, that is adding a third party repository from WebUpd8 team. WebUpd8 doest keep the java binaries in their server, they just provide a script that can download and install Oracle Java 8. So let us begin.

Open the Terminal and type as follows.


sudo add-apt-repository ppa:webupd8team/java
sudo apt-get update
sudo apt-get install oracle-java8-installer

and follow the on screen instructions.

thats it, you have installed java 8. happy coding

Fixing ‘file’ access is not allowed due to restriction set by the accessExternalSchema property in Java 8

After installing Java 8, I faced this issue ‘schema_reference: Failed to read schema document ‘MyWebservice.xsd_1.xsd’, because ‘file’ access is not allowed due to restriction set by the accessExternalSchema property’ when i tried to create web service client for my Java EE Webservice in Netbeans. Upon investigation i found that the error is happening for all java 8 users who is working with web service clients. to fix this error, please do the following.
Please create a file named ‘jaxp.properties‘ and paste the below content to it.
javax.xml.accessExternalSchema = all

save the file to your jdk installation directory/jre/lib folder.

that’s it. the issue will be fixed now. happy coding.

Installing Java8 in Fedora 20

Java8 is the latest SDK for Developing Java Applications. For information about java8, please visit the oracle java8 page. In this post, i will show how to install java8 in Fedora 20.

Step1: Download Java8

Java8 can be downloaded from Oracle Java8 Page. As of writing, The latest version available is Java8 update 11. Download the rpm file as per your architecture. I downloaded jdk-8u11-linux-x64.rpm as i have 64 bit Fedora installed in my computer. Please change the file name as per the file you are downloading.

After downloading, please open terminal and type the following command.

sudo -i

rpm -Uvh  /path_to_rpm/jdk-8u11-linux-x64.rpm

This will install java in your computer. now we need to create link to the executable using the alternatives command. the commands format is

alternatives [options] –install link name path priority [–slave link name path]… [–initscript service]

the priority option will set the priority of the link if more than one version is installed. since i have java 8 version 1.8.0_11 i am setting the priority as 18011, but check your computer to determine if any other version is set wih higher priority number. the higher the number, the higher the priority is. so we don’t want to set the latest version in a lower priority. to check the priority, type the following command in terminal.

alternatives --display java

since i don’t have a more priority version found, i am sticking wth the number 18011.

Enter the following in terminal.


alternatives --install /usr/bin/java java /usr/java/latest/jre/bin/java 18011
alternatives --install /usr/bin/javaws javaws /usr/java/latest/jre/bin/javaws 18011
## Browser Plugin 32-bit ##
alternatives --install /usr/lib/mozilla/plugins/libjavaplugin.so libjavaplugin.so /usr/java/latest/jre/lib/i386/libnpjp2.so 18011
## Browser Plugin 64-bit ##
alternatives --install /usr/lib64/mozilla/plugins/libjavaplugin.so libjavaplugin.so.x86_64 /usr/java/latest/jre/lib/amd64/libnpjp2.so 18011
alternatives --install /usr/bin/javac javac /usr/java/latest/bin/javac 18011
alternatives --install /usr/bin/jar jar /usr/java/latest/bin/jar 18011

This will complete the installation, happy coding…

Installing Flash Player in Fedora 20

Adobe Flash Player is an essential utility that we cannot avoid in our daily computer activities. whether it is a Desktop/Laptop or Smartphone/Tablet we cannot avoid it. It helps us play multimedia content over web browsers. In order to run some websites we need this plugin to be installed in our computer. some websites like youtube may not provide you better experiance if you have not installed it. So here is how we install it in Fedora 20.

Step 1 : Install Adobe Yum Repository

Adobe repository contains the installation / updation files for Adobe Flash Player and other plugins and softwares. run the below command in your terminal to install the Adobe Yum Repository in your computer.

For 32 Bit Fedora 20


sudo -i
rpm -ivh http://linuxdownload.adobe.com/adobe-release/adobe-release-i386-1.0-1.noarch.rpm
rpm --import /etc/pki/rpm-gpg/RPM-GPG-KEY-adobe-linux


For 64Bit Fedora 20


sudo -i
rpm -ivh http://linuxdownload.adobe.com/adobe-release/adobe-release-x86_64-1.0-1.noarch.rpm
rpm --import /etc/pki/rpm-gpg/RPM-GPG-KEY-adobe-linux

Step 2 : Install Adobe Flash Player in Fedora 20


yum install flash-plugin nspluginwrapper alsa-plugins-pulseaudio libcurl

Thats it. The installation is complete.

SEO tips for Startups / Beginners

seo

Search Engine Optimization or SEO, as the term suggests, is vital for every website or company who need to make a presence online. SEO is not a one step process that we can do once and forget. SEO is a regular practice of improving the website in order to generate traffic from search engines.

Does my website need SEO?

The major search engines – Google, Yahoo and Bing drives majority of web traffic. Although Social Media like Facebook, Twitter and Google+ can generate visits to your website, search engines are still the primary method of navigating most internet uses. People tends to search using these engines for what they want. Even though search engines are smart enough, it still need our help to understand the content and index in their database. If your site is not optimized for the search engines there is a chance that you miss the opportunities to websites provided via search.

Whom this article is for?

This article targets the beginners who just started a website or having a website with a less number or pages (under 50) and hoping to rank only for a handful of relevant terms. This article layouts the common practices that we begin with and the major pitfalls we need to avoid while doing SEO.

SEO for Startups / Beginners

Let us begin with the root point of our website, the Identity, that is, the domain name:

  1. Choosing the domain name
    Always perform a background check while choosing a domain name. This is the most important part to begin with as there is a chance that the domain is previously owned by somebody and the domain might have been black listed by the search engines for doing some SEO malpractices or unethical marketing practices. Below are some steps that can help you with the domain background check.
    1. Review the internet archive (WayBack machine) to ensure the websites content appears legitimate. The WayBack machine captures snapshots of web sites (like Google cache) and it will be helpful to know what the content the previous owner hosted on the domain.
    2. Use the site explorer and click through the sites back-links. Look for patters that may indicate excessive blogroll links, directory links, blog comment span etc… You need to ensure that the previous owner did not took part in some link building scheme that will be associated with the domain name.
    3. Review the sites Google cached date and cached text only version.
      Search cache:yourdomainname in Google’s search box and you will get the last cached version by Google, click on the text only version link to view the text Google cached.
    4. Finally, find out how many times the previous owner switched the hosting service. Use some WHOIS tool to identify detailed information regarding the site. The longer the site sticks with the same host, the stable the website is.

Once you have taken the above steps, you can make an informed decision while registering a pre-owned domain.

  1. Decide www.yourdomain.com or yourdomain.com

    Select whether you need your website shown in the www version or the non-www version of your domain name. After making a decision make permanent redirect (301) the other version to your selected version. This will help search engines to consolidate the indexing. Make sure you use 301 redirection, not 302 (temporary) because when search engine sees 301 status code, it will transfer all the indexes from the source to the target page.

  2. Creating the website

    While creating the website, make sure these guidelines are followed.

    1. Do not over design your website. Make sure the content is not hidden by your design or JavaScript and the pages are easily readable by crawlers.
    2. Make sure the targeting keywords are included in Title and ALT tags. For example the keyword included in flash or images are hard to read by crawlers.
    3. Do not stuff keywords, remember to consider not only crawlers, but humans too. If the content is junk or illegitimate, the users will bounce from your pages more often and it will give a negative impact.
    4. Make sure the content loading is not blocked by links. Consider Google Page Speed guidelines while designing the pages. Google tends to rank fast loading pages.
    5. Make the web pages W3C standards compatible. This help the crawlers understand your ages better.
    6. Use common words for keywords, research keywords using Google Adwords
    7. Make sure every page includes
      1. A unique topic.
      2. A unique title.
      3. Unique Meta description.
      4. Keywords in URL.
      5. Descripting anchor text for every link.
      6. Descriptive ALT for all images.
    8. Incorporate breadcrumbs
    9. Make sure all pages are properly linked.
  3. Hosting Website.
    While hosting, make sure you include a robots.txt and the target pages are not blocked. Generate a sitemap (you can use online tools to generate one) and make sure all pages are included in the sitemap. If some pages are missing, crawler is going to miss that page too. Host the sitemap in your root directory.

The SEO process is not ending after hosting. We still need to go miles. More on SEO in the next part.

Asp.net MVC routing using Attributes

AttributeRouting is an open source Nuget package which allows to specify routes using attributes in your controllers and actions.

Top Features

  1. Decorate your actions with GET, POST, PUT, DELETE, and verb agnostic attributes.
  2. Map multiple routes to a single action, ordering them with an Order property.
  3. Specify route defaults and constraints inline and also using attributes.
  4. Specify optional params inline with a token before or after the parameter name.
  5. Specify the route name for supporting named routes.
  6. Define MVC areas on a controller or base controller.
  7. Group or nest your routes together using route prefixes applied to a controller or base controller.
  8. Support legacy URLs.
  9. Set the precedence of routes among the routes defined for an action, within a controller, and among controllers and base controllers.
  10. Generate lowercase outbound URLs  automatically.
  11. Define your own custom route conventions and apply them on a controller to generate the routes for actions within the controller without boilerplate attributes (think RESTful style).
  12. Debug your routes using a supplied HttpHandler.

Installing

In Nuget package manager console type the below line :


Install-Package AttributeRouting

Usage


public class ProductsController : Controller
{
[GET("Products")]
public ActionResult Index()
{
return View();
}

[GET("Products/New")]
public ActionResult New()
{
return View();
}

[POST("Products")]
public ActionResult Create()
{
return RedirectToAction("Index");
}

[GET("Resources/{id}")]
public ActionResult Show(int id)
{
return View();
}

[GET("Products/{id}/Edit")]
public ActionResult Edit(int id)
{
return View();
}

[PUT("Resources/{id}")]
public ActionResult Update(int id)
{
return RedirectToAction("Show");
}

[GET("Products/{id}/Delete")]
public ActionResult Delete(int id)
{
return View();
}

[DELETE("Products/{id}")]
public ActionResult Destroy(int id)
{
return RedirectToAction("Index");
}
}

in order to make the above code working you need to have the RoutingAttributes library to find them and create corresponding routes in routes table. make the below changes in the global.asax


public static void RegisterRoutes(RouteCollection routes)
{
routes.IgnoreRoute("{resource}.axd/{*pathInfo}");

routes.MapAttributeRoutes();
}

if you have installed this package via Nuget, you will have a file in app_start folder that will call this registration hook automatically

ASP.Net MVC Areas

Introduction

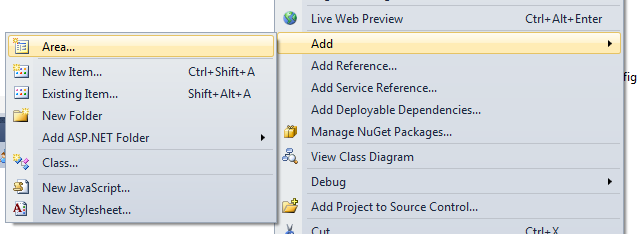
Areas allows you to separate your large projects into more distinct partitions. Its like having a sub project inside your main project. All your Controllers, Views and Models for a specific module will belong to one directory structure. To create an area simply right click on anywhere in your project in solution explorer and click on Add – > Area The area will create in a new ”Areas” Folder.

Once created you can see the all familiar folder structure like Controllers, Views and Models inside the newly created Area folder by name. you can also see a new AreaRegistration.cs starting with your area name. this class is derived from AreaRegistration class in System.Web.Mvc and contains one overridden property  AreaName and another overridden method RegisterArea. the property will return your Area name and the method registered the routes we define under the area. creating an area also calls AreaRegistration.RegisterAllAreas in Application_start method in Global.asax.cs.

Content of AdminAreaRegistration.cs


public class AdminAreaRegistration : AreaRegistration
{
public override string AreaName
{
get
{
return "Admin";
}
}

public override void RegisterArea(AreaRegistrationContext context)
{
context.MapRoute("Admin_default",
"Admin/{controller}/{action}/{id}",
new { action = "Index", id = UrlParameter.Optional });
}
}

Content Of Application_Start


protected void Application_Start()
{
AreaRegistration.RegisterAllAreas();

RegisterGlobalFilters(GlobalFilters.Filters);
RegisterRoutes(RouteTable.Routes);
}

ASP.NET MVC4 Developer Preview Released.

Microsoft has released ASP.Net MVC4 Developer Recently.

This version contains a lot of new features like

New default project template.

The default project template is redesigned to more modern looking website. The template employs a technique called adaptive rendering to look good in both desktop browsers and mobile browsers without any customization. Another enhancement is the use of JQueryUI to provide a richer UI. The login and register links in this template uses JQueryUI Dialog.

New mobile project template

Asp.Net MVC4 supports developing a website specifically for mobile or tablet browsers. You can use the new Mobile Application project. This is based on the JQuery Mobile, a JQuery based library for building touch optimized UI.

Display Modes

The new Display Mode feature lets an application select views depending on the browser that”s making the request. For example, if a desktop browser makes the request, the application might use the ViewsHomeIndex.cshtml template. If a mobile browser requests the home page, it might use the ViewsHomeIndex.mobile.cshtml template.

You can download ASP.Net MVC4 for Visual Studio 2010 from http://go.microsoft.com/fwlink/?LinkID=226335

Microsoft released Asp.Net MVC3 tools update

Microsoft has released a new update for Asp.Net MVC3. This update won’t update the MVC3 runtime, it only updates the tooling for MVC3 and this also installs NuGet v1.2 (NuGet is a Visual Studio extension that makes it easy to add, remove, and update libraries and tools in Visual Studio projects that use the .NET Framework). You can download the MVC3 tools update from here.

Changes in ASP.NET MVC 3 Tools Update

  • New Intranet Project Template for Windows Authentication.
  • HTML 5 checkbox to enable HTML 5 versions of project templates.
  • “Add Controller” dialog box can now scaffold controllers with views and data access code.
  • Project templates now include Modernizr 1.7 (Modernizr adds classes to the <html> element which allow you to target specific browser functionality in your stylesheet without actually need to write any JavaScript to use it)
  • Project templates include updated versions of jQuery (jQuery 1.5.1), jQuery UI (jQuery UI 1.8.11), and jQuery Validation (jQuery Validation 1.8) .
  • Project templates now include ADO.NET Entity Framework 4.1 as a pre-installed NuGet package.
  • Project templates include JavaScript libraries as pre-installed NuGet packages.

Moving Large MySQL Databases

I was upgrading my client’s vbulletin forum from one shared hosting server to another. The old server’s control panel was cpanel and new one is plesk. so I had to manually move the database (which is around 2 GB in size). I tried phpmysql but phpmysql doesn’t support large SQL files, so the alternate option was to try using SSH. But unfortunately both the old and new servers doesn’t support SSH too. It took a lot of search using Google to get a utility named bigdump, I managed to execute the entire script in some easy steps using this utility. Open this in notepad or some other editor, change the connection settings and specify the SQL dump file. Upload bigdump.php and the SQL file to the new server. Open a browser and point where bigdump.php is located in your server. That’s all; this will execute the script in batches. Thanks to Alexey Ozerov for providing this wonderful script.